If you attempt to add an email address that’s already in use in Smartsheet, you'll receive an error message stating that the address can't be added. To successfully associate your account with the desired email address, use one of the following methods.
If you have questions about either of these options or aren't sure how to proceed, contact us and our support team will be happy to assist you.
Method 1: Use a Third Email Address to Facilitate the Change
Use this method if others have shared sheets with you and you want to retain that sharing. To use this method, you'll need to have access to a third email address (one that isn't in use in Smartsheet).
Prefer video? Watch the video demo at the end of this article.
- Log in to Smartsheet using the email address that you were attempting to associate with an account when you received the "can't add" error message.
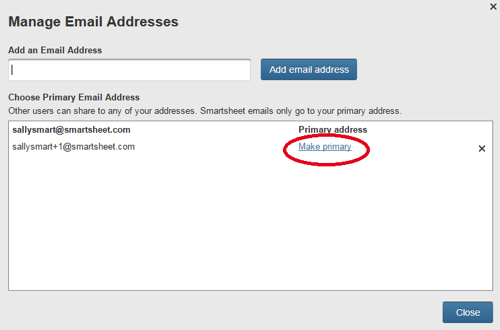
- Click Account > Personal Settings > Profile and click Manage Email Addresses.
- From Manage Email Addresses, associate the additional email address to be used with your account. That is, add the third email address (the one that's not currently used anywhere in Smartsheet).
- Click Add email address.
- To finalize adding the alternate (third) email address, you'll need to switch to email and click the activation link in the email confirmation that's sent to that address–the mail will be sent to the third email address.
- Once you've confirmed the address, click Make Primary to make the third address the primary address associated with the account.
- Log out and then log back in to Smartsheet, using the third email address as your login.
- Now that you've changed the primary address, you can remove the email address you'd like to use in the other account (the account that you were using when you received the "can't add..." error message). To do this, click the X to the right of the email address.
- Log out and then log back in to the account that you want to use the email address in (the account that you were using when you received the error). Add the desired email address (Click Account > Personal Settings > Profile and click Manage Email Addresses.)
Method 2: Transfer a Paid Subscription
Use this method if you don't have sheets shared to the email address associated with your current (paid) subscription. To transfer a paid subscription, follow the steps outlined in the Transferring a Paid Subscription help article to change the email address.